Image Segmentation - A case of online Retail
- Sep 12, 2017
- 8 min read
All codes related to this blog can be found on my GitHub page
Before running code, download following requirements and place in the same working directory 1) Download VGG_ 16 weights from here
2) Download required images from here (unzip and place the folder in current working directory)
3) Download annotation files from here (unzip and place the folder in current working directory)
4) In case of any error, first check requirements.txt file. check wheter any updated package is giving error? (mostly keras)
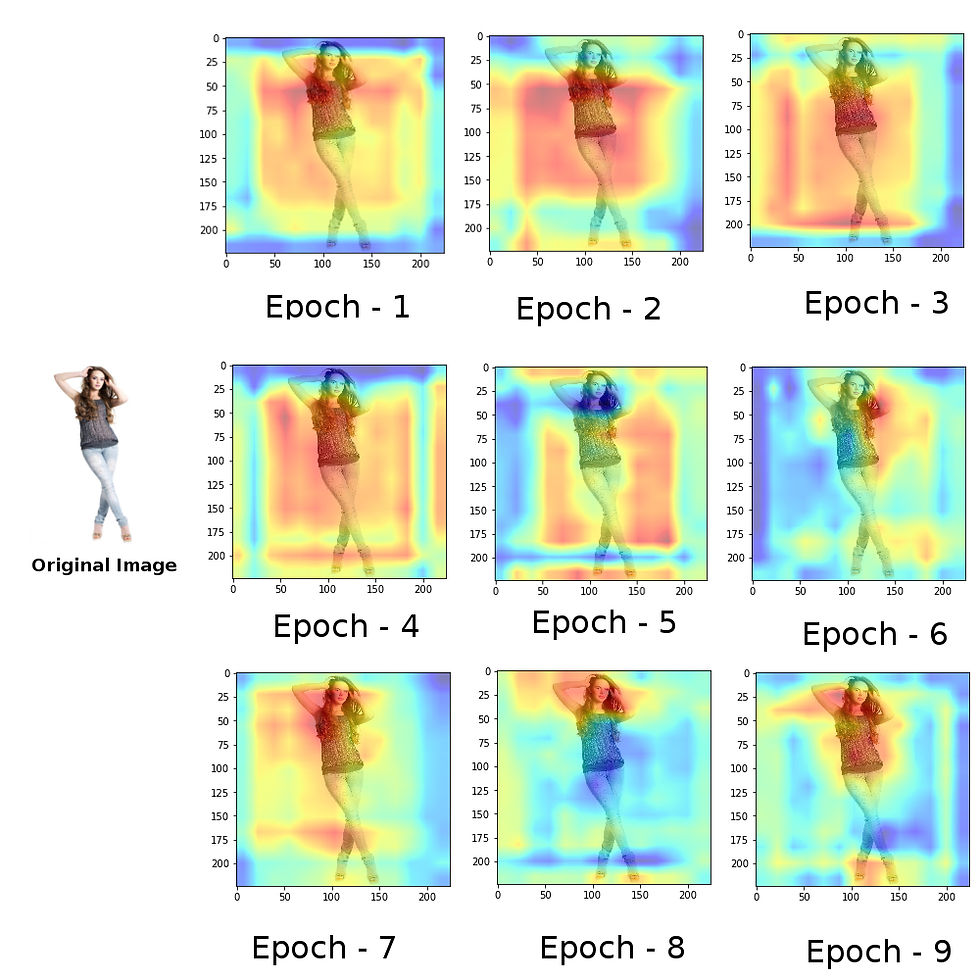
Progressive object localization with VGGCAM to localize T-shirt in the picture (Red flare represents region being responsible for prediction of class T-shirt)
From a couple of days, I was reading the papers regarding, RCNN and its advancements. In earlier blog-post, I have given a clear explanation of how things work for object detection in an image. Next question is how to locate that object. This is where RCNN comes in picture. RCNN is capable of identifying an object in an image and it repetitive manner can tag many objects in the same image. RCNN is not as simple as we were have done many image e classification.
I could try RCNN with VGG network but I wanted to do something practical usable one. So I choose an example of retail business. To understand the problem first we need to understand the logic behind How big retail works. Let's take Amazon as an example, this guy is huge with millions of items up and available. To put anything on amazon, may have following procedure
1) A retailer or bulk producer reach out to Amazon 2) Ask for Amazon for selling something 3) Amazon grant permissions and access permissions to its sale management console 4) If that retailer want to sell a “T-shirt for Male” to Amazon he performed following steps In given online form by Amazon, retailers enter relevant details including
A) valid name B) image C) its hierarchy Garments> male > t-shirt > slim fit D) other information
Now the third point is tricky if you see the millions of products and thousand of such category exists Now got me ?? its quite tiresome job and time-consuming too. Considering this, I have an idea, If that t-shirt was automatically classified into hierarchy upon uploading its image to Amazon portal, nice isn't it??. In addition to this other related products are identified from photograph and added and properly classified automatically . we could at least save some time and keep out retailer happy and productive too. If any such retailer wants to sell 100 products, he needs to follow this step 1000 times.
Training a machine for all product in the world is a computationally expensive task so I did, what ever I could with available resources.
Here in this tutorial, we will practically see, how to not only identify an object in the image but also to locate it where it exists in the image. Before I tell you anything I want you to look at below given image whereby entire concept in pictured. The same thing we want to achieve- technically called as Image Segmentation.
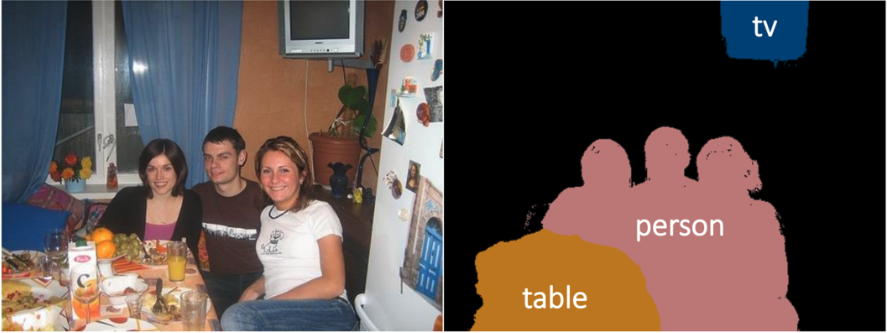
Figure 1. Image segmentation thereby separating different object class wise in picture.
Techniques for image segmentation/object localization have come a long way. A decade earlier we used to have techniques like Haar, Shift, and Hog for Image segmentation. With invent and advancement of GPU based CNN architecture a revolution in images segmentation started and soon all giant like Facebook and Microsoft jumped into it. It all started with a paper from MIT -“Learning Deep Features for Discriminative Localization
” by Bolei Zhou and coworkers in 2014. Soon after this paper Ross Girshick came up with his research paper “Rich feature hierarchies for accurate object detection and semantic segmentation” simply known as Regions with Convolutional Neural Network or R-CNN. Soon a team at Microsoft came up with more precise and faster algorithm of R-CNN and named it as fast-RCNN. Soon after this facebook came up with more precise Mask R-CNN and few researchers came up with faster R-CNN. Chase to achieve state of art Segmentation still continue but we have achieved a lot in this segment in past 3 years.
In this blog I have started with something basic, basically, I am going to implement technique described in a paper a paper “Learning Deep Features for Discriminative Localization” by Bolei Zhou and coworkers. This will be a starting point for our next set of implementations on Image segmentation.
In this tutorial, we will see, How we can implement and utilize image segmentation for online retails.

Figure 2. Approaches and research in field of image segmentation
This tutorial is really complicated than earlier ones. This involves two massive models and lot of information processing to get the desired output. All codes are available on my GitHub page and I will be explaining each block of code step by step here in this blog.
The over all flow of the blog goes in this way:
It is having following components :
1) Batch wise Image generator – It's obvious that all Images will not be present in RAM at a time. The job of the batch generator is to load the batch of required Images to RAM and keep it in Numpy format.
2) VGG Network Model, Its famous model generated by Visual Geometry Group - University of Oxford. VGG was trained on 1000 different classes and fine tuning such network on a small specialized dataset (our retail data set) would yield great results.
The network architecture of the VGG is as given below:
3) VGGCAM Model
CAM stands for Class Activation Mapping.This model is special and has specialized layer. In this model, all fully connected layer from the bottom of the VGG model is replaced by a convolutional layer and max pooling with the massive size of 14 * 14. usually we use pool size of 2*2 or 3*3. but when pulled with such a high pool size the weights heat map actually represents the portion of the image which was actually responsible for the prediction of the class. The pulled filter will be multiplied by factor 16 so that [14* 14] scale out by multiplying with factor 16 yields heat map of size [224 * 224](size of the actual image). Such heat map shows higher activation at the portion of the image which is responsible for prediction of given class of in the image.
A class activation map for a particular category indicates the discriminative image regions used by the CNN to identify that category.
The overall architecture of the VGG model Class Activation Mapping model can be shown by the following image.

Figure 3. Simplified Image showing how Cass activation mapping works by creators of the “Learning Deep Features for Discriminative Localization”
4) A class activation map generator
A function which takes a particular class and generates 2D heat map for that class taking weight of last convolution layer of VGGCAM
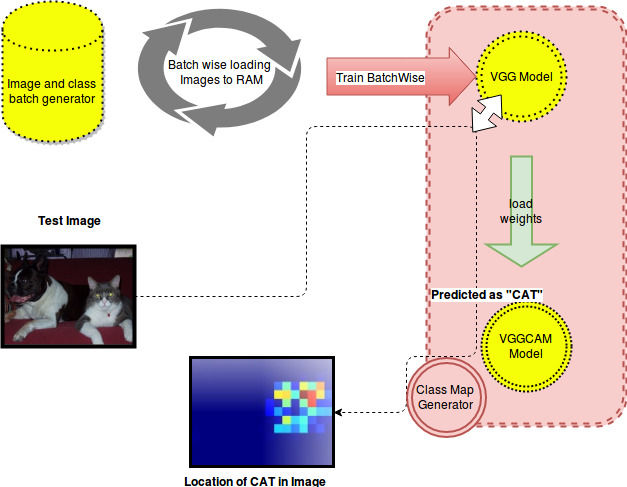
Figure 4. This flow chart explains all procedure for object localization. 1) A batch generator provides images and labels repetitively. 2) A VGG model with pre-trained wights, get fine tuned on provided images with labels 3) at each iteration, from weights of VGG, last fully connected layers are removed and convolutional layer with pull size 14*14 introduced. 4) Vgg network will predict the class of the test image pass its weights and predicted class to VGGCAM model. VGGCAM model will produce class activation map and class activation generator plot such weights into the 2D heat map.
Having captured entire idea behind working on this technique, let's move to the implementation part.
1) VGG NETWORK
def getModelDefination(trainedModelPath=None): """ core definition of model :return: compiled model """ # defining convolutional network model = Sequential() model.add(ZeroPadding2D((1, 1), input_shape=(3, 224, 224))) model.add(Convolution2D(64, 3, 3, activation='relu')) model.add(ZeroPadding2D((1, 1))) model.add(Convolution2D(64, 3, 3, activation='relu')) model.add(MaxPooling2D((2, 2), strides=(2, 2)))
model.add(ZeroPadding2D((1, 1))) model.add(Convolution2D(128, 3, 3, activation='relu')) model.add(ZeroPadding2D((1, 1))) model.add(Convolution2D(128, 3, 3, activation='relu')) model.add(MaxPooling2D((2, 2), strides=(2, 2)))
model.add(ZeroPadding2D((1, 1))) model.add(Convolution2D(256, 3, 3, activation='relu')) model.add(ZeroPadding2D((1, 1))) model.add(Convolution2D(256, 3, 3, activation='relu')) model.add(ZeroPadding2D((1, 1))) model.add(Convolution2D(256, 3, 3, activation='relu')) model.add(MaxPooling2D((2, 2), strides=(2, 2)))
model.add(ZeroPadding2D((1, 1))) model.add(Convolution2D(512, 3, 3, activation='relu')) model.add(ZeroPadding2D((1, 1))) model.add(Convolution2D(512, 3, 3, activation='relu')) model.add(ZeroPadding2D((1, 1))) model.add(Convolution2D(512, 3, 3, activation='relu')) model.add(MaxPooling2D((2, 2), strides=(2, 2)))
model.add(ZeroPadding2D((1, 1))) model.add(Convolution2D(512, 3, 3, activation='relu')) model.add(ZeroPadding2D((1, 1))) model.add(Convolution2D(512, 3, 3, activation='relu')) model.add(ZeroPadding2D((1, 1))) model.add(Convolution2D(512, 3, 3, activation='relu')) model.add(MaxPooling2D((2, 2), strides=(2, 2))) model.add(Flatten()) model.add(Dense(4096, activation='relu')) model.add(Dropout(0.5)) model.add(Dense(4096, activation='relu')) model.add(Dropout(0.5)) model.add(Dense(2, activation='softmax')) # compiling model model.compile(optimizer='sgd', loss='categorical_crossentropy',metrics=['accuracy']) # returning Model return model
2) VGG CAM model
def VGGCAM(nb_classes, num_input_channels): """ Build Convolution Neural Network nb_classes : nb_classes (int) number of classes num_input_channels : number of channel to be kept in last convolutional model of VGGCAM returns : Neural Net model """ VGGCAM = Sequential() VGGCAM.add(ZeroPadding2D((1, 1), input_shape=(3, 224, 224))) VGGCAM.add(Convolution2D(64, 3, 3, activation='relu')) VGGCAM.add(ZeroPadding2D((1, 1))) VGGCAM.add(Convolution2D(64, 3, 3, activation='relu')) VGGCAM.add(MaxPooling2D((2, 2), strides=(2, 2)))
VGGCAM.add(ZeroPadding2D((1, 1))) VGGCAM.add(Convolution2D(128, 3, 3, activation='relu')) VGGCAM.add(ZeroPadding2D((1, 1))) VGGCAM.add(Convolution2D(128, 3, 3, activation='relu')) VGGCAM.add(MaxPooling2D((2, 2), strides=(2, 2)))
VGGCAM.add(ZeroPadding2D((1, 1))) VGGCAM.add(Convolution2D(256, 3, 3, activation='relu')) VGGCAM.add(ZeroPadding2D((1, 1))) VGGCAM.add(Convolution2D(256, 3, 3, activation='relu')) VGGCAM.add(ZeroPadding2D((1, 1))) VGGCAM.add(Convolution2D(256, 3, 3, activation='relu')) VGGCAM.add(MaxPooling2D((2, 2), strides=(2, 2)))
VGGCAM.add(ZeroPadding2D((1, 1))) VGGCAM.add(Convolution2D(512, 3, 3, activation='relu')) VGGCAM.add(ZeroPadding2D((1, 1))) VGGCAM.add(Convolution2D(512, 3, 3, activation='relu')) VGGCAM.add(ZeroPadding2D((1, 1))) VGGCAM.add(Convolution2D(512, 3, 3, activation='relu')) VGGCAM.add(MaxPooling2D((2, 2), strides=(2, 2)))
VGGCAM.add(ZeroPadding2D((1, 1))) VGGCAM.add(Convolution2D(512, 3, 3, activation='relu')) VGGCAM.add(ZeroPadding2D((1, 1))) VGGCAM.add(Convolution2D(512, 3, 3, activation='relu')) VGGCAM.add(ZeroPadding2D((1, 1))) VGGCAM.add(Convolution2D(512, 3, 3, activation='relu'))
# Add another conv layer with ReLU + GAP VGGCAM.add(Convolution2D(num_input_channels, 3, 3, activation='relu', border_mode="same")) VGGCAM.add(AveragePooling2D((14, 14))) VGGCAM.add(Flatten()) # Add the W layer VGGCAM.add(Dense(nb_classes, activation='softmax')) # VGGCAM.summary() return VGGCAM
Note that last fully connected layers of the VGG are replaced by large pooling layer VGGCAM.add(AveragePooling2D((14, 14))).
3) Fine tuning VGG Model with specialized train set
As explained earlier, at each iteration a new set of images fine tune VGG model and after training, weights are passed to VGGCAM model, where with the help of large pulling a class activation is developed for the given class
def train_VGGCAM(trained_weight_path, nb_classes,epoches,batchSize, num_input_channels): """ Train VGG model args: VGG_weight_path (str) path to keras vgg16 weights nb_classes (int) number of classes num_input_channels (int) number of conv filters to add in before the GAP layer """
# Load model trainedModel = getModelDefination(trainedModelPath=trained_weight_path)
# Compile sgd = SGD(lr=0.001, decay=1e-6, momentum=0.9, nesterov=True) trainedModel.compile(optimizer=sgd, loss='categorical_crossentropy',metrics=['accuracy']) for epochNo in range(0,epoches): print "Epoch No : ", epochNo batch_Count = 0 for image,labels in getImageAndCategory(batchSize): try: # last 10 image selection for test while training # train model with rest images for i in range (len(trainedModel.layers)): print (i, trainedModel.layers[i].name), print "\n"+"%"*100 trainedModel.fit(image,labels,batch_size=50,nb_epoch=1, verbose=1) modelCAM = VGGCAM(nb_classes,num_input_channels) print ("NAME OF LAYERS IN NEW MODEL FOR CAM") for i in range (len(modelCAM.layers)): print (i, modelCAM.layers[i].name),
# Load weights to new model for k in range(len(trainedModel.layers)): weights = trainedModel.layers[k].get_weights() modelCAM.layers[k].set_weights(weights) # modelCAM.layers[k].trainable=True if k==16: break print('\nModel loaded.') batch_Count = batch_Count + 1 modelCAM.save_weights("CAM_Trained.h5") # to see performance of model on one of the image while training plot_classmap("CAM_Trained.h5",trainedModel, "jeans.jpg", 1,nb_classes,num_input_channels) except: print traceback.print_exc()
4) Get Heat MAP
def get_classmap(model, X, nb_classes, batch_size, num_input_channels, ratio): """ To get heat map from the weight present in last convolutional layer in VGGCAM network """ inc = model.layers[0].input conv6 = model.layers[-4].output conv6_resized = absconv.bilinear_upsampling(conv6, ratio, batch_size=batch_size, num_input_channels=num_input_channels) WT = model.layers[-1].W.T conv6_resized = K.reshape(conv6_resized, (1, -1, 224 * 224)) classmap = K.dot(WT, conv6_resized) # print "\n"+"$"*50 classmap = classmap.reshape((1, nb_classes, 224, 224)) get_cmap = K.function([inc], classmap) return get_cmap([X])
5) plotting heat map
def plot_classmap(VGGCAM_weight_path, trainedModel,img_path, label, nb_classes, num_input_channels, ratio=16): """ Plot class activation map of trained VGGCAM model args: VGGCAM_weight_path (str) path to trained keras VGGCAM weights img_path (str) path to the image for which we get the activation map label (int) label (0 to nb_classes-1) of the class activation map to plot nb_classes (int) number of classes num_input_channels (int) number of conv filters to add in before the GAP layer ratio (int) upsampling ratio (16 * 14 = 224) """
# Load and compile model modelCAM = VGGCAM(nb_classes, num_input_channels) modelCAM.load_weights(VGGCAM_weight_path) modelCAM.compile(loss="categorical_crossentropy", optimizer="sgd") img = image.load_img(img_path, target_size=(224, 224)) x = image.img_to_array(img) #vgg model is used to predict class label = trainedModel.predict_classes(x.reshape(1, 3, 224, 224),verbose=0)
batch_size = 1 classmap = get_classmap(modelCAM, x.reshape(1, 3, 224, 224), nb_classes, batch_size, num_input_channels=num_input_channels, ratio=ratio) classes = ["jeans","tshirt"] print "PREDICTED LABEL : ", classes[label[0]] plt.imshow(img) #mapping activation on the basis of weights activation = classmap[0,0, :, :]+classmap[0,1, :, :] plt.imshow(activation, cmap='jet', alpha=0.5, interpolation='nearest') plt.show() # plt.imsave(VGGCAM_weight_path+".jpg",classmap[0, label, :, :])
When I progressively checked performance improvement in the model epoch by epoch, I got following result, It is very clear that if such large amount of specific examples are provided it can actually perform great.
Figure 5. Progressive object localization with VGGCAM to localize T-shirt in the picture (Red flare represents region being responsible for prediction of class T-shirt)
I do understand, that this requires a lot of training, I have tried to develop a prototype. To this prototype, one can provide N number images and M number of classes to make the prediction. To train such model it would require highly powerful, state of art GPUs.


Comments